Friday, May 31, 2013

How to Make a Painting

Here's a how to on making a painting. I'm using an Orchid Painting I made for a friend as an example.

STEP ONE: Choose a Subject. (For example purposes my subject is an Orchid)
                      Take pictures of the Subject, google ideas/images, or get a book from your local library. It's important to remember that finding an image on the internet and copying it exactly is uncreative and illegal. You should use the materials and images found as a reference point only. If you took the picture you may copy it. (Follow these same tips but use your photo as your "sketch" by tracing it and transfering it, or enlarging it)

STEP TWO: Make a Sketch. Especially important for commissioned work. Do a couple different sketches so you have some choices and practice:


STEP THREE: After choosing which sketch you like best you are ready to enlarge the "photo" to the appropriate size by making a grid over your original (if it makes it easier do a basic outline over original):
                                                                           
STEP FOUR:
Prime your canvas with white paint or gesso paint even strokes with a sponge brush or soft brush - you want no lines or stray brush hairs on your canvas. For a smoother application add a small amount of water (you can add more water if it is not going on smoothly)If you make it very thick or do have lines you may sand down your layer in a well ventilated area with a light grade sandpaper. Paint one layer horizontally and one layer vertically:


STEP FIVE: lightly draw a grid. Make sure the grid has the same amount of boxes as the sketch. To calibrate a small scale to a large one. ex - 4 boxes across and 4 up on your sketch should be the same on canvas 4 across and 4 up. simply divide the the measurements by 4. i,e. 20x 28. 20 divide by 4 =5, 28 divded by 4 = 7. So, 4 five inch boxes = 20, 4 seven inch boxes = 28. This grid is just to help get the proportions close to that of the original sketch. don't torture yourself with making it fit exactly. This is why you are lightly sketching and going to erase any problems. Proceed to transfer your sketch to the canvas. When it's how you want it erase stray marks:

STEP SIX: You are finally ready to begin painting! I used acrylics and I always use Red, Blue, Yellow, Black, and White. (Since you can make any color from these).  Where to begin? Think about your painting in layers. What is it okay to paint over? Also known as background to foreground. In my case I started with the Stems:
              The Supplies: Paints, A Cup of Water, to mix your colors - a palette,plastic dish,
      or baby food jar(to save large quantities of paint) Lots of brush choices, thin, wide, soft, bristled.
The Stems will need a dark "shadow" color, and a "light" highlight color for definition.

                              Blend the light and dark colors where they meet for a smoother edge
                                     (must be blended while wet - acrylics dry very quickly)

                                               STEP SEVEN: The Underlying Shadows:
You may need to play around on a scrap paper to get the correct tone. 
Acrylics tend to dry a little darker than they go on.

                 STEP EIGHT: Adding Details After Your base colors are done (notice the pink                     and yellow underlying tones inner parts of the Orchid (i forgot the term for this feel
free to comment and tell me the correct term)
                       Get Creative! I used the end of a brush to make the little detailed dots. You              
                                 could even use beads if applied while wet or with glue when dry.
                                                                 LOOKING GOOD!

STEP NINE: Finally You are ready for a border.If you are not framing it you can 
paint all the way to the edges. or paint a pseudo frame. I Painted a frame to match my friends pillows in her living room because this painting was for her :)
                                         I added a sky blue border with a turquoise highlight.
                                      Can you see the small hint of turquoise in the flowers?
TA DA! A finished piece. Make sure you remember to sign your work :)
GREAT JOB! I hope you enjoyed your 
"How to Make a Painting" Tips to see more of my work or request something visit:

THANKS for reading my Blog!

Jamie 


Wednesday, May 1, 2013

Magazine Bracelet

How to Make a Magazine Bracelet. 
Mothers Day Recycled Craft Idea #3

I have been making jewelry for about 8 or 9 years now. The idea to make magazine jewelry is new. i hope you like what I've come up with. Feel free to comment :) To check out my other jewelry go here:
To check out My Magazine Baskets go here:


What you are Making

Step One: 

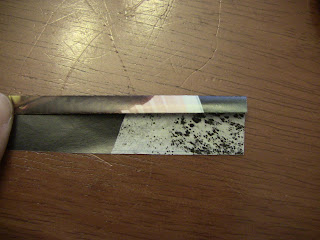
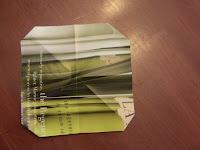
I used a square from the previous flower project. (fold a magazine page in half vertically and than fold that in half horizontally) Cut out those four squares. Fold one into a triangle shape.

Fold towards the point. The fold here is about half an inch

Fold again :)

Place a piece of tape (or some glue stick glue, some elmers glue, double sided tape) or whatever else you should so choose to use, under the triangle and tape it down so it stays put.

Now take another square and fold it about a quarter of an inch. (use different colors and prints for whatever color, or style you prefer)

Fold it again. Glue or tape to keep in place.

Tape or glue the first piece to the second :)

Repeat Steps for second piece. To make a 2nd second piece. Tape those together as well.

Tape the bracelet together. (make it large enough to slip on 
and  off of you wrist
TA DA!!! a magazine bracelet. ( For a more durable 
bracelet Tape over entire bracelet)
bracelet with a clear Tape

I HOPE YOU ENJOYED SOME MORE FUN IDEAS! Next, Magazine Earrings :)

Sunday, April 28, 2013

Magazine Flowers

Second Post as promised for Mothers day here's another easy recycled project to do:

                                       MAGAZINE FLOWERS

Step One: The First Flower Piece

Rip out a magazine page
fold in half


Fold that half in half
Cut Along the folded lines to get 4 squares


                                           Use Different colors to add variety to your flowers
                                                                           
fold this small square the same was as the large, so there are 4 smaller squares
Fold into a triangle
fold the other side as well. It should like this when done :)
round out the corners by folding them backwards.
cut small slits on the sides where the first folds were made.
Fold these sides in as well. TIP: longer slits slimmer petals
TA DA! the first flower is done

STEP TWO: Making the center piece to hold your flower together


about one third and one half of a piece of paper (easier to shorten the middle piece than lengthen)
Roll it up

roll it up. use glue, tape, glue dots, craft stick. your choice. (to help it stay together)
You should have a small hole in the center (right). Simply put the stem through the hole (left)
fold the next flower the opposite direction to add depth to your flowers. 
And repeat the same directions as the last flower piece
Here is an example of the slimmer petal look :)
Combine these two flower pieces and TA DA! a beautiful magazine flower

Google magazine flowers for more ideas!

checkout my gift basket site to see some more recycled magazine art. 

I HOPE YOU ENJOYED THIS IDEA. NEXT MAGAZINE BRACELETS :)


Friday, April 26, 2013

Tissue Paper Flowers

Mothers Day is right around the corner. I will be posting easy recycled ideas for presents until the big day.

EASY IDEA NUMBER ONE:
                                   Tissue Paper Flowers

Step One:
Supplies- Two colors of tissue paper (what are your moms favorite colors),scissors,pipe cleaner,twistie,or green floral wire.

Step Two:
Cut out 4 squares of each color and alternate them as above. TIP  - bigger squares bigger flowers, smaller squares smaller flowers

Step Three:
Fold one side down about half an inch.
Flip The Paper and Fold down on that side. Keep this up until the paper reminds you of a polka playing accordion. 

Step Four:
Add what ever you decided to use. (twistie,floral wire, or pipe cleaner) 

Step Five:
Peel up one piece of tissue paper. Be Careful! It rips easily :)


Repeat Until All layers are Peeled up.


TA DA! I told you it was easy. 

I Hope you enjoyed the first idea. Next, A magazine Flower.....

Do you have a mother that would rather join in the craft making? Check out my "Crafters Dream" Basket @ harmoniousearthgb.yolasite.com

Thanks for checking out my How to on Tissue Paper Flowers! ~ Jamie